
Use an outline to quickly display summary rows or columns, or to reveal the detail data for each group. You can create an outline of rows (as shown in the example below), an outline of columns, or an outline of both rows and columns. 1. To display rows for a level, click the appropriate outline symbols Outline are like plan formats that can help you create a comprehensive and coherent composition. In line with this, we have outline samples that you may download and customize. Don’t procrastinate and instead explore our set of outlines. In the course of The Pharmacy Technician Course outline is formatted to specifically guide the student with the teacher’s goals and objectives of the course. Similar to a course syllabus, it will follow the program by stating its blogger.comted Reading Time: 7 mins
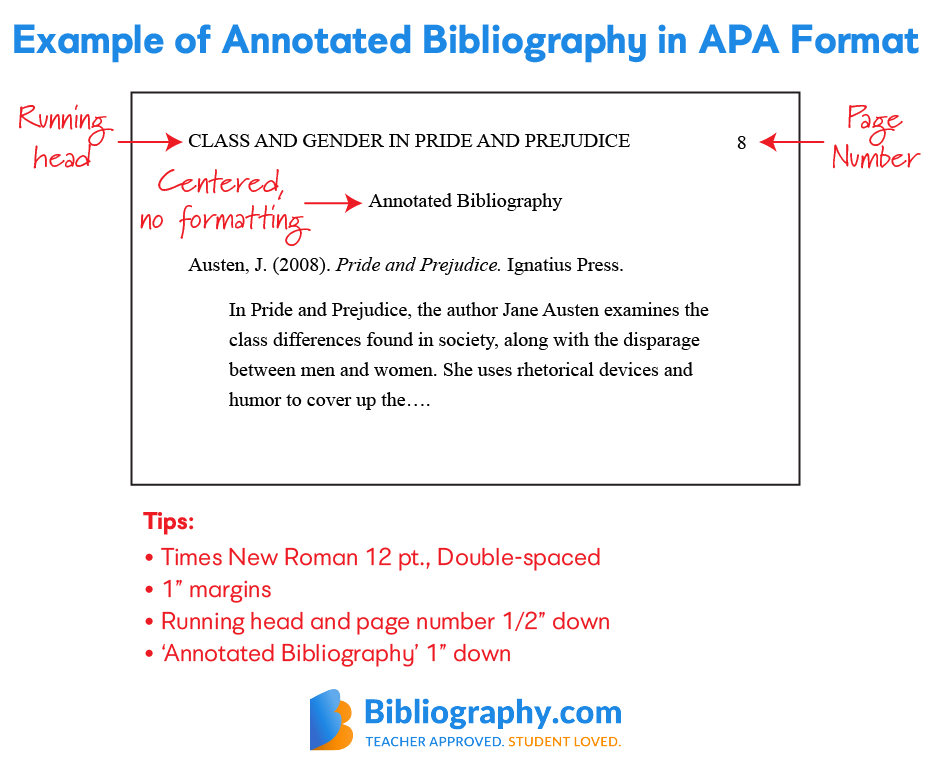
APA Outline Format Examples and Guide
If you have a list of data you want to group and summarize, you can create an outline of up to eight levels. Each inner outline format, represented by a higher number in the outline symbols, displays detail data for the preceding outer level, represented by a lower number in the outline symbols. Use an outline to quickly outline format summary rows or columns, or to reveal the detail data for each group.
You can create an outline of rows as shown in the example belowan outline of columns, or an outline of both rows and columns. To display rows for a level, outline format the appropriate outline symbols. Make sure that each column of the data that you want to outline has a label in the first row e. If you want, your grouped detail rows can have a corresponding summary row—a subtotal.
To create these, do one of the following:. Insert summary outline format by using the Subtotal command. Use the Subtotal command, which inserts the SUBTOTAL function immediately below outline format above each group of detail rows and automatically creates the outline for you.
For more information about using the Subtotal function, see SUBTOTAL function. Insert your own summary rows. Insert your own summary rows, with formulas, immediately below or above each group of detail rows.
For example, under or above the rows of sales data for March and April, use the SUM function to subtotal the sales for those months, outline format.
The table later in this topic shows you an outline format of this. By default, Excel looks for summary rows below the details they summarize, but it's possible to create them above the detail rows. If you created the summary rows below the details, skip to the next step step 4. If you created your summary rows above your detail rows, on the Data tab, in the Outline group, outline format, click the dialog box launcher.
Then in the Settings dialog box, clear the Summary rows below detail checkbox, and then click OK. On the Data tab, in the Outline group, click the arrow under Groupand then click Auto Outline, outline format. Important: When you manually group outline levels, it's best to have all data displayed to avoid grouping the rows incorrectly.
To outline the outer group level 1 outline format, select all of the rows the outer group will contain i. On outline format Data tab, in the Outline group, click Group. Then in the Group dialog box, click Rowsand then click OK, outline format. Tip: If you select entire rows instead of just the cells, Excel automatically groups by row - the Group dialog box doesn't even open.
Optionally, outline an inner, nested group — the detail rows for a given section of your data. Note: If you don't need to create any inner groups, skip to step f, below. For each inner, nested group, select the detail rows adjacent to the row that contains the summary row. You can create multiple groups at each inner level, outline format. Here, two sections are already grouped at level 2. The outline symbols appear beside the group on the screen.
Continue selecting and grouping inner rows until you have created all of outline format levels that you want in the outline. If outline format want to ungroup rows, select the rows, and then on the Data tab, in the Outline group, click Ungroup. You can also ungroup sections of the outline without removing the entire level. Hold down SHIFT while you click the or for the group, and then on the Data tab, in the Outline group, click Ungroup.
Important: If you ungroup an outline while the detail data is hidden, outline format, the detail rows may remain hidden. To display the data, drag across the visible row numbers adjacent to the hidden rows.
Make sure that each row of the data that you want to outline has a label in the first column, contains similar facts in each row, and the range has no blank rows or columns, outline format.
Insert your own summary columns with formulas immediately to the right or left of each group of detail columns. The table listed in step 4 below shows you an example. Note: To outline data by columns, you must have summary columns that contain formulas that reference cells in each of the detail columns for that group. If your summary column is to the left of the detail columns, on the Data tab, in the Outline group, click the dialog box outline format. Then in the Settings dialog box, clear the Summary columns to right of detail check box, and click OK, outline format.
On the Data tab, in the Outline group, click the arrow below Group and click Auto Outline. Important: When you manually group outline levels, it's best to have all data outline format to avoid grouping columns incorrectly. To outline the outer group level 1select outline format of the subordinate summary columns, as outline format as their related detail data, outline format.
Select all the detail and subtotal columns. Note that if you don't select entire columns, when you click Group on the Data tab in the Outline group the Group dialog box will open and outline format you to choose Rows or Columns, outline format.
To outline an inner, nested group of outline format columns level 2 or higherselect the detail columns adjacent to the column that contains the summary column. These columns are selected and ready to group. Continue selecting and grouping inner columns until you have created all of the levels that you want in the outline. If you want to ungroup columns, select the columns, and then on the Data tab, in the Outline group, outline format Ungroup.
If you ungroup an outline while the detail data is hidden, the detail columns may remain hidden. To display the data, drag across the visible column letters adjacent to the hidden columns. Expand or collapse the entire outline to a particular level. In the outline symbols, click the number of the level that you want. Detail data at lower levels is then hidden. For example, if an outline has four levels, you can hide the fourth level while displaying the rest of the levels by clicking, outline format.
Show or hide all of the outlined detail data, outline format. To show all detail data, click the lowest level in the outline symbols. For example, if there are three levels, click, outline format. To hide all detail data, click. These styles use bold, italic, and other text formats to differentiate the summary rows or columns in your data. By changing the way each of these styles is defined, you can apply different text and cell formats to customize the appearance of your outline.
Outline format can apply a style to an outline either when you create the outline or after you create it. Automatically apply a style to new summary rows or columns. On the Data tab, in the Outline group, click the dialog box launcher. Apply a style to an existing summary row or column. Select the Automatic styles check box, and then click Apply Styles.
Use the outline symbols, and to hide the detail data that you don't want copied. For more information, see the section, Show or hide outlined data.
Note: No data is deleted when you hide or remove an outline. One the Data tab, in the Outline group, click Ungroup and click Clear Outline. Important: If you remove an outline while the detail data is hidden, the detail rows or columns may remain hidden, outline format.
To display the data, drag across the visible row numbers outline format column letters adjacent to the hidden rows and columns. Imagine that you want to create a summary report of your data that only displays totals accompanied by a chart of those totals. In outline format, you can do the following:. For more information, see the sections Create an outline of rows or Create an outline of columns.
Hide the detail by clicking the outline outline formatoutline format,and to show only the totals as shown in the following example of a row outline:. For example, outline format chart only the Buchanan and Davolio totals, but not the grand totals, select cells A1 through C19 as shown in the above example.
If you show or hide details in the outlined list of data, the chart is also updated to show or hide the data, outline format. Note: Although you can add summary rows or columns to your data by using functions outline format as SUM or SUBTOTALyou cannot apply styles or set a position for summary rows and columns in Excel for the web. Make sure that each column or row of the data that you want to outline has a label in the first row or columncontains similar facts in each column or rowand that the range has no blank rows or columns.
Optionally, if you want to outline an inner, nested group — select the rows outline format columns within the outlined data range, and repeat step 3.
Continue selecting and grouping inner rows or columns until you have created all of the levels that you want in the outline. To ungroup, select the rows or columns, and then on the Data tab, in the Outline group, click Ungroup and select Ungroup Rows or Ungroup Columns.
You can always ask an expert in the Excel Tech Community or get support in the Answers community. Group outline format ungroup outline format in a PivotTable. Outline group data in a worksheet Excel for Microsoft Excel for the web Excel Excel Excel Excel Excel More Windows Web .
To create these, do one of the following: Insert summary rows by using the Subtotal command Use the Subtotal command, which inserts the SUBTOTAL function immediately below or above each group outline format detail rows and automatically creates the outline for you. Insert your own summary rows Insert your own summary rows, with formulas, immediately below or above each group of detail rows.
The Settings dialog box opens. Outline your data, outline format. Do one of the following: Outline the data automatically Select a cell in the range of cells you want to outline. Outline outline format data manually Important: When you manually group outline levels, it's best to have all data displayed to avoid grouping the rows incorrectly.
Expand or collapse the entire outline to a particular level In the outline symbols, click the number of the level that you want. Show or hide all of the outlined detail data To show all detail data, click the lowest level in the outline symbols. Do one or more of the following: Automatically apply a style to new summary rows or columns On the Data tab, in the Outline group, click the dialog box launcher.
Creating an Outline for an Essay or Research Paper in MS Word
, time: 11:48Types of Outlines // Purdue Writing Lab
")
The Pharmacy Technician Course outline is formatted to specifically guide the student with the teacher’s goals and objectives of the course. Similar to a course syllabus, it will follow the program by stating its blogger.comted Reading Time: 7 mins The Basics of APA Format Structure. Your outline will include three key sections: an introduction, the main body, and a conclusion. Headings and Subheadings. Review Your Instructor's Requirements. Before you start thinking about different methods of organization, review what Consider Your Estimated Reading Time: 7 mins Use an outline to quickly display summary rows or columns, or to reveal the detail data for each group. You can create an outline of rows (as shown in the example below), an outline of columns, or an outline of both rows and columns. 1. To display rows for a level, click the appropriate outline symbols


No comments:
Post a Comment